Assets and Work Orders — September 23, 2017

Assets and Work Orders


Assets are used to track what products or services a customer has previously purchased, and are referenced in other areas of the Service Cloud such as entitlements and work orders.


While products represent the items that your company sells, assets represent the specific products your customers have purchased. Assets have a serial number, date of purchase, and other information related to an individual sale. Depending on how your organization uses assets, they can represent a competitor product that your customer has or versions of your products.

Use assets to store specific information about the products your customers have. You can view assets on the Assets tab. Depending on your page layouts, you also can view asset related lists on your account, contact, and product page layouts.

You can introduce hierarchy to assets in your org to represent more complex products. An asset hierarchy can contain up to 10,000 assets. Define relationships between assets using the Parent Asset field on assets.

If your admin has set up entitlements, your customers may be eligible for support based on an asset they’ve purchased.


A work order represents work to be performed on your customers’ products

Work Orders were introduced in the Spring ’16 Release of Salesforce, and are used to represent action(s) that are performed on product or asset.


For example, a customer service rep (CSR) at ABC Refrigeration receives a phone call that the customer’s refrigerator (asset) does not work. The CSR creates a case to track the customer’s problem. After troubleshooting with the customer using Knowledge Articles, the CSR acknowledges that a service technician will need to be dispatched to repair the refrigerator. A Work Order is issued to track the repair.

 

Difference between solutions and knowledge? — September 22, 2017

Difference between solutions and knowledge?


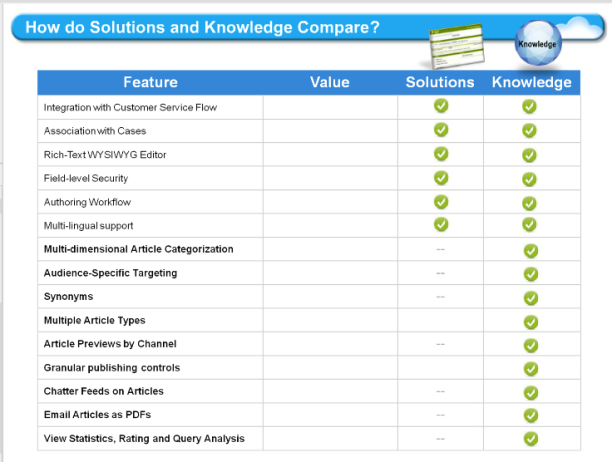
knowledge.jpg


To start with, here are some of the things they have in common:

  • Integration with Customer Service Flow (i.e., related lists on Case Page Layout, attachable to case, can be made visible in a Customer portal.
  • Multi-Dimensional Categorization using parent and child categories
  • Rich-Text WYSIWYG Editor
  • Following in Chatter Feeds

Now that we have that out of the way, let’s consider the areas where Knowledge outshines Solutions (hyperlinks in this section will take you to the appropriate Salesforce help page):


Continue reading

Enable reCAPTCHA in web-to-cases —

Enable reCAPTCHA in web-to-cases

Web-to-case works much the same way web-to-lead does, except that it generates a case record instead of a lead, and the default limit is 5000 cases per day.

Web-to-case uses several specifically designated fields to capture data:
Web Company
Web Email
Web Name
Web Phone

If the email address of a web-to-case submission matches the email address of only one contact, then that contact is associated with the case.

Enable reCAPTCHA in Web-to-Case to make it easy for customers to contact your company while making it difficult for spambots to waste service representatives’ time.


Web-to-Case must be enabled to use reCAPTCHA for case submission.

Continue reading

Child Cases — September 19, 2017

Child Cases


Let’s understand what child cases are with an example

For instance, let’s say you use cases to manage facility maintenance. Someone calls to report that one of the buildings has lost power. This power outage is created as a case. Then, someone calls to report that the lights in their room do not work. With some probing you discover they are in the building without power; this gets logged as a child case.

Child cases are not automatically closed when parents cases are.

Check out package Auto Close Child Cases if you would like this functionality.

Create parent-child relationships for Cases —

Create parent-child relationships for Cases

Case hierarchies can be constructed using the parent case standard field. This can be useful in scenarios where one case is the direct result of another.

To set up a parent-child relationship for cases

To add ‘Parent Case’ field to the Page Layout:

1. Go to Setup | Customize | Cases | Page Layouts.
2. Click on the page layout for which you wish to enable ‘Case Hierarchies’.
3. Click Edit and choose Parent Case from the ‘Case Fields’ section and move it to your page layout.
4. Click Save.

To set Field Level Security for ‘Parent Case’ field:

1. Go to Setup | Customize | Cases | Fields
2. Select the Parent Case field | click View Field Accessibility.
2. Click the Field Access for each Profile and select the Visible checkbox.
3. Click Save.

To add the ‘Related Cases’ related list on the Page Layouts:

1. Go to Setup | Customize | Cases | Page Layouts.
2. Click the page layout for which you wish to enable ‘Related Cases’ list.
3. Click ‘Edit’ and scroll down to the Related List section.
4. Use the box on the right and select the View for Case Related Lists.
5. Drag and Drop Related Cases into the Related List section of the Page Layout.
Orders-Opportunities-contract overview — September 18, 2017

Orders-Opportunities-contract overview

Orders are used to capture a commitment between your organization and a customer to fulfill declared goods or services.

Opportunities are often used to represent the lifetime value of a sale.

A contract is typically used to represent a legally binding agreement.

For example, within a parts manufacturer, a sales rep creates an opportunity representing the sale of 200,000 units. The customer agrees to purchase 200,000 units at a specified price over the period of one year; this agreement is captured within a contract record. The customer draws down this commitment by placing orders for parts over the period stipulated in the agreement.

In the above scenario, the order indicates which parts were purchased, price, ship date, and other logistical information.

The orders object is intended to be integrated with ERP systems (e.g. SAP, Oracle).

Opportunity Private? —

Opportunity Private?

When creating an Opportunity , you can select the Private checkbox to make the Opportunity a private one.

screenshot-ap5.salesforce.com-2017-09-18-16-49-17-097

Private indicates that the opportunity is private. Only the record owner, users above that role in the hierarchy, and administrators can view, edit, and report on private opportunities. Not available in Group or Personal Editions. Private opportunities do not trigger Big Deal Alerts or workflow rules. Private opportunities count towards your forecasts only if you have Customizable Forecasting or Collaborative Forecasts enabled. Users with the “View All Forecasts” permission can see private opportunities within the Forecasts tab.

Note
When you mark opportunities Private, any opportunity teams, opportunity splits, and sharing are removed. (The owner of a private opportunity receives 100% of split types that total that amount.)
Campaign ROI —

Campaign ROI

How is Campaign ROI measured?

ROI is the percentage a campaign has returned above its cost.Formula: (Total Value Won Opportunities – Actual Cost) / Actual Cost

Example

For instance, the total value won by this campaign is $20,000.  The actual cost was $11,400.  Therefore its ROI is 75% (rounded).

Important: How Total Value of Won Opportunities is Calculated

Opportunities are only included in campaign ROI calculations if both of following are true:

  1. The campaign is listed as the opportunity’s primary campaign source.
  2. The opportunity’s stage type is closed/won (see Sales Processes and Opportunity Stages for details on stage type).

How to run Salesforce campaign ROI reports:

Click on the campaigns tab, and run the “Campaign ROI Analysis Report”.


How is Campaign influence different from ROI reports?

Campaign influence tracks pipeline and revenue for multiple campaigns, and ties all campaigns of a contact role to that opportunity for pipeline and ROI reporting. This is especially helpful for longer deal cycles when more than one campaign contributes to a closed deal or a converted lead.

How can I track which opportunities resulted from campaigns?

One key benefit of campaigns is the ability to track how much business has been generated from each campaign. When you create an opportunity, you can fill in the Primary Campaign Source field to indicate that the opportunity resulted from a specific campaign.

In addition, when you convert a lead that is linked to a campaign, that campaign is automatically inserted into the opportunity Primary Campaign Source field.

If a lead or contact is linked to multiple campaigns, the campaign with which he or she is most recently associated is inserted into the opportunity Primary Campaign Source field.

The Opportunities related list on a campaign shows every opportunity that is linked to that campaign. You can also run the Campaign Revenue Report to track which opportunities are linked to your campaigns.

Set Up Customizable Campaign Influence —

Set Up Customizable Campaign Influence

Let your marketing department attribute revenue across multiple campaigns.
User Permissions Needed
To set up Customizable Campaign Influence: “Customize application”
  1. Ensure that you have either the Sales Cloud or CRM permission set license assigned to your user profile.
    These permission sets allow you to enable and manage Customizable Campaign Influence.
  2. Enable Customizable Campaign Influence in Setup.
    Out of the box, the Salesforce influence model is selected as the primary model. Only The Salesforce model supports auto-association. Auto-association adds campaigns to opportunities automatically when the contact on an opportunity is also a member of a campaign. The Salesforce model is always locked. For a locked model, campaign influence records can only be added or edited via workflows and the API. Your users can’t add records manually in Salesforce.
  3. If you use the original version of Campaign Influence, choose whether to migrate existing campaign influence records with 0% attribution to the new Salesforce model.
  4. If you plan to implement your own methods of assigning credit for opportunities to campaigns, add your own custom attribution models.
    If you set up more than one influence model, designate one of them as the primary model. The primary model’s records appear in the Campaign Influence related list on opportunities and the Influenced Opportunities related list on Campaigns.
  5. Assign the Campaign Influence permission to sales and marketing users who need it.
  6. Add the Campaign Influence related list to Opportunity page layouts.
    This related list shows the campaigns that have touched the opportunity. Only campaign influence records from your primary influence model appear in the list.
  7. Add the Influenced Opportunities related list to Campaign page layouts.
    This related list shows the opportunities influenced by the campaign. Only campaign influence records from your primary influence model appear in the list.
  8. Add the Campaign Results section to Campaign page layouts.
    The Campaign Results section shows the total amount brought in by the campaign, based on your primary campaign influence model.